


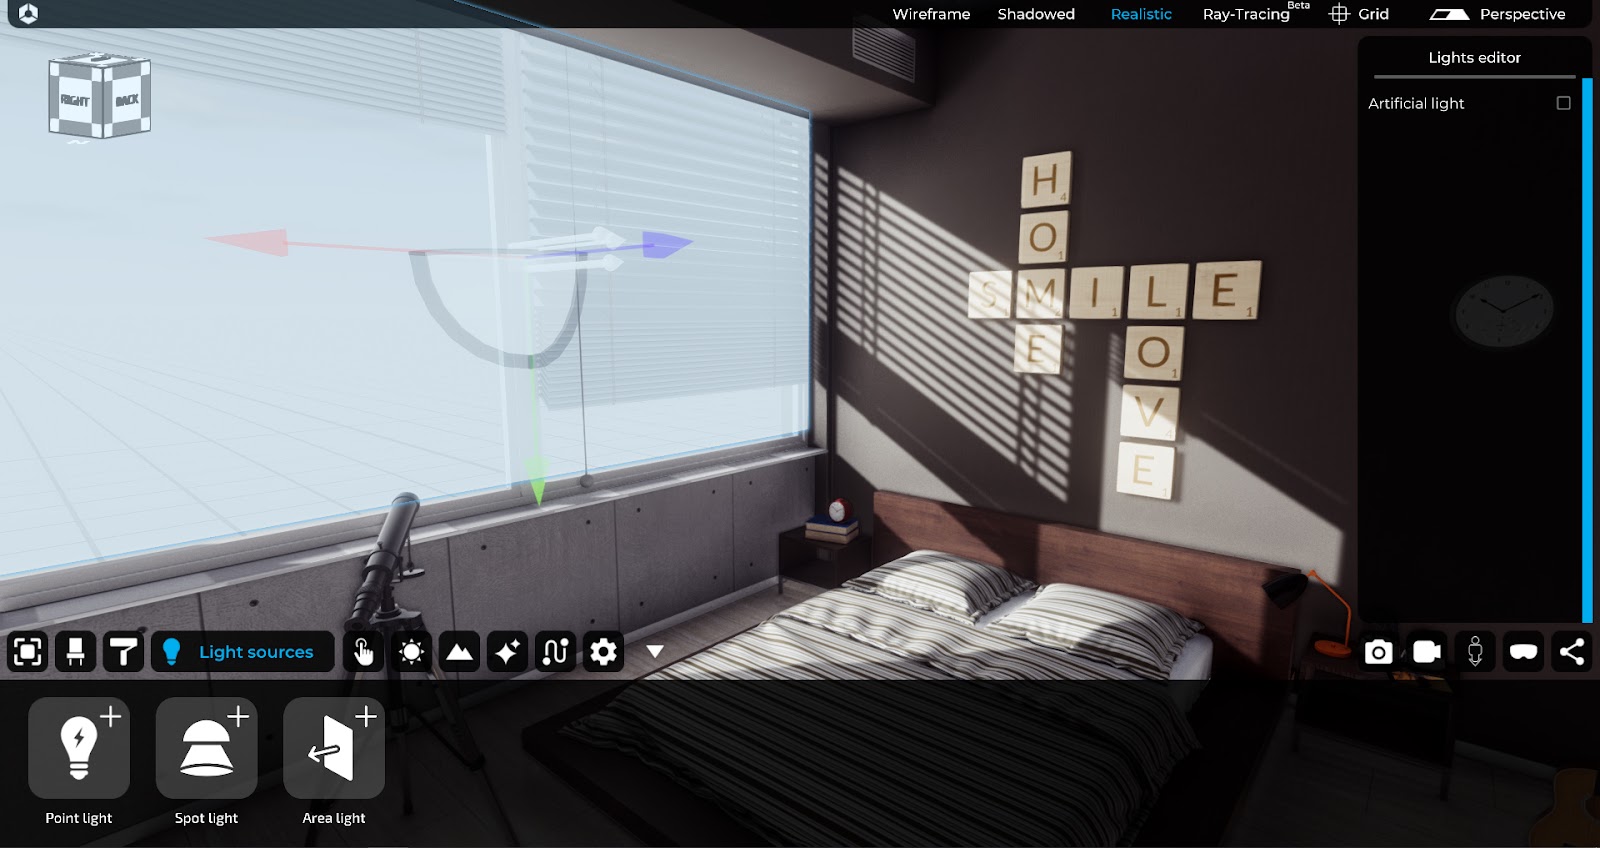
Eyecad VR offers the possibility to add a series of artificial lights, able to simulate the effect of omnidirectional sources (point light), spot (spot light) and area (area light).
Inside the TAB: “Light sources” you can create the different types of lights, to position them in the scene by drag’n’drop. The light sources available in the Eyecad VR light creation tab are:
- Point-light
- Spot-light
- Area-light

Point light
The point-light is a light source that can be freely positioned in the scene. From the point of emission, it projects a beam of light in an omnidirectional manner, controllable by parameters present in the TAB.

To create and position the point-light, simply select it in the “Light sources” tab and drag it inside the scene (drag and drop). The gizmo (x, y, z) allows the point-light to be positioned precisely in the scene.
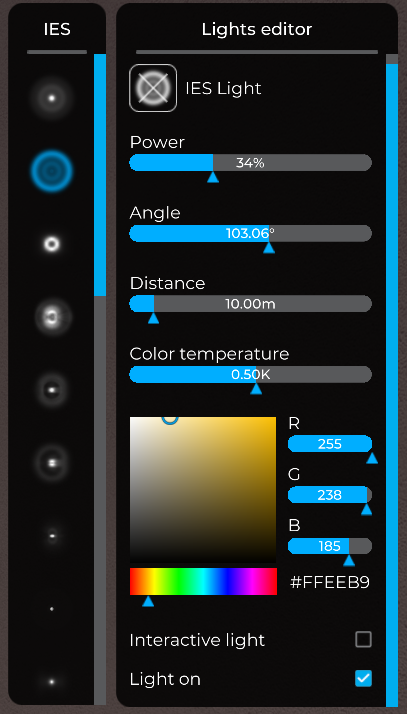
The point light parameters can be edited through the “Light Editor” TAB, where it is possible to configure:
- IES Lights: it allows to choose one IES file from the library included in Eyecad VR to apply to the light source.
- Power: it indicates the quantity of light emitted expressed in percentage terms (%).
- Angle: it indicates the radius of the light beam emitted, expressed in degrees (°).
- Distance : it indicates the area of effect of the light source, through its depth, which is equivalent to the visibility limit of the light emitted, expressed in meters (m).
- Color temperature: it indicates the color of the light emitted by the source, expressed in degrees Kelvin (K).

In the Interactions section, the light editor allows you to choose whether to offer the option of turning the point light on and off during navigation in the scene. This option has an influence in the exploratory phase and allows (light on / light off) to configure the preset for each point light in the scene.
Spot-light
The spot-light is a light source that can be freely positioned in the scene. From the point of emission, it projects a beam of light through a conical beam with a variable radius, which can be configured using the configuration parameters in the TAB.

To create and position the Spot-light, simply select it in the “Light sources” tab and drag it inside the scene (drag and drop). The gizmo (x, y, z) allows you to precisely position the source and destination of the spot-light in the scene:
- IES lights: it allows to choose one IES file from the library included in Eyecad VR to apply to the light source.
- Power: it indicates the quantity of light emitted expressed in percentage terms (%).
- Angle: it indicates the radius of the emitted light cone, expressed in degrees (°).
- Distance : it indicates the area of effect of the light source, through its depth, which is equivalent to the visibility limit of the light emitted, expressed in meters (m).
- Color temperature: it indicates the color of the light emitted by the source, expressed in degrees Kelvin (K).

In the Interactions section, the light editor lets you choose whether to offer the option of turning the spot-light on and off while navigating in the scene. This option has influence in the exploratory phase and it allows (light on / light off) to configure the preset for each spot-light in the scene.
IES Lights
IES Lights are used to create a realistic light projection from the light sources (spot or point) added in the 3D environment. This feature is very important to increase the realism of the lights. It is possible to choose on IES light file by clicking on the (+) button on the top of the lights editor. It will appear a new window, very close to the lights editor, that contains the IES file library.
Area-light
The Area-Light is a surface that acts as a projector (Sky-portal) of ambient light. It is mainly used for lighting interior spaces, to increase the level of definition and to obtain a more realistic rendering of the chromatic component of light. Its operation consists of projecting all the environmental components in the scene into an architectural space. For the reasons mentioned above it is advisable to position the Area Light in correspondence with the openings of the interiors in the scene.
To create and position the Area-light, simply select it in the “Light sources” tab and drag it inside the scene (drag and drop). The gizmo (x, y, z) allows you to precisely position the source and destination of the spot-light in the scene. The Area Light takes effect only in the direction indicated by the arrow vector.
The “Modify” TAB allows you to change the surface area of the Area-light any time.
In the case of the Area-Light (default as Sky-portal) there are no additional modification parameters, as the light source adapts in real time to the ambient lights in the scene, emitting in a perpendicular way to the direction of emission indicated by the arrow vector.
In the case of the Artificial Area-Light ( by clicking on the Artificial light button) a new menu appears which is possible to set some parameters for the artificial arealight that is often used like as roof led lights or neon effects
