Posts by Eyecad VR

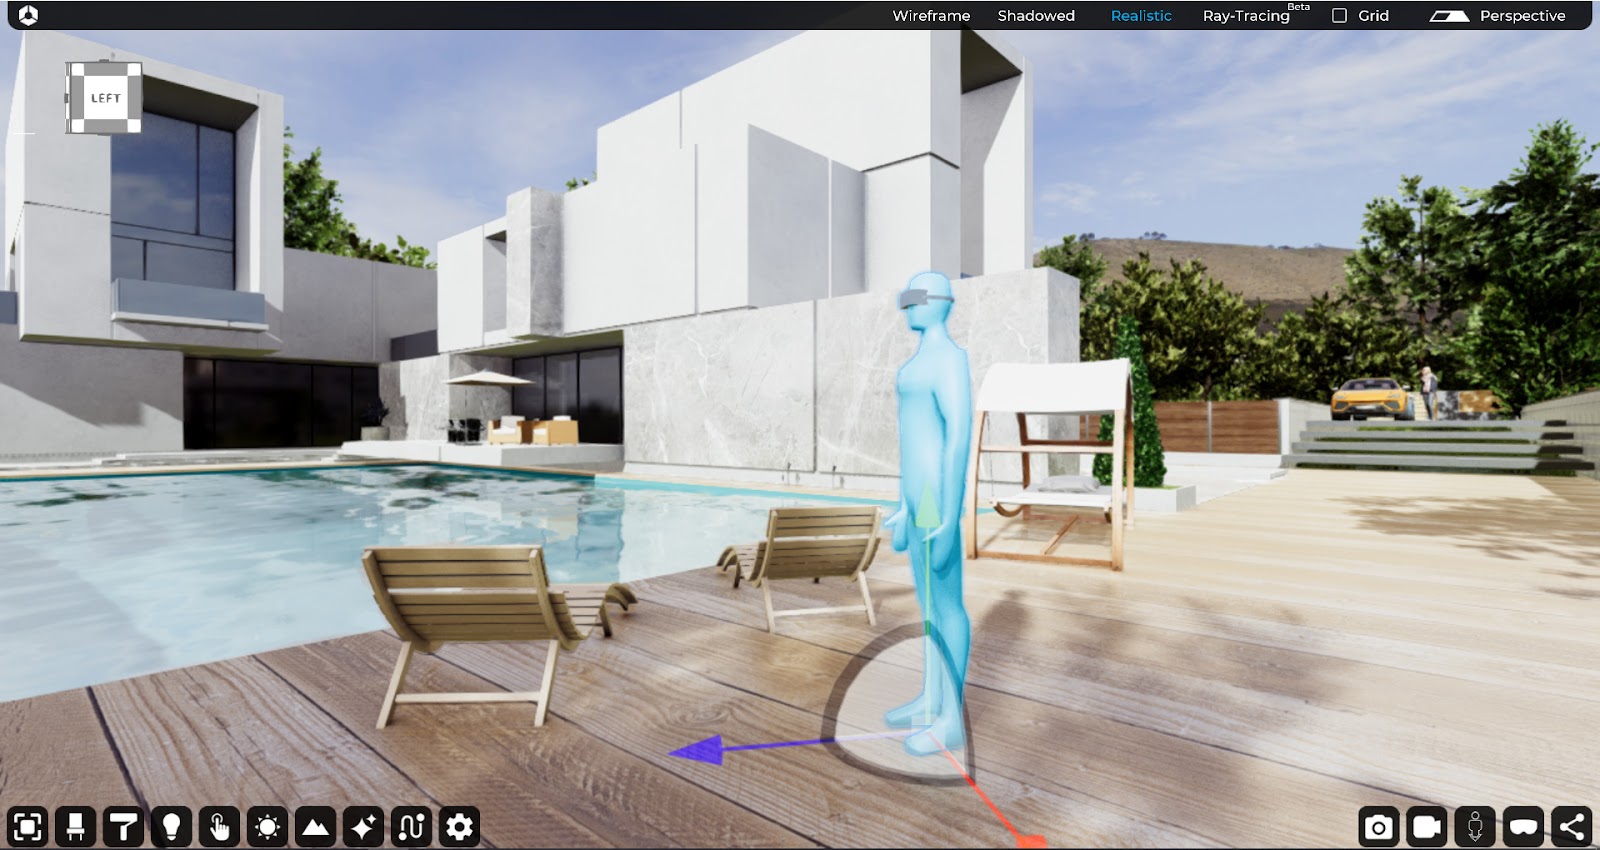
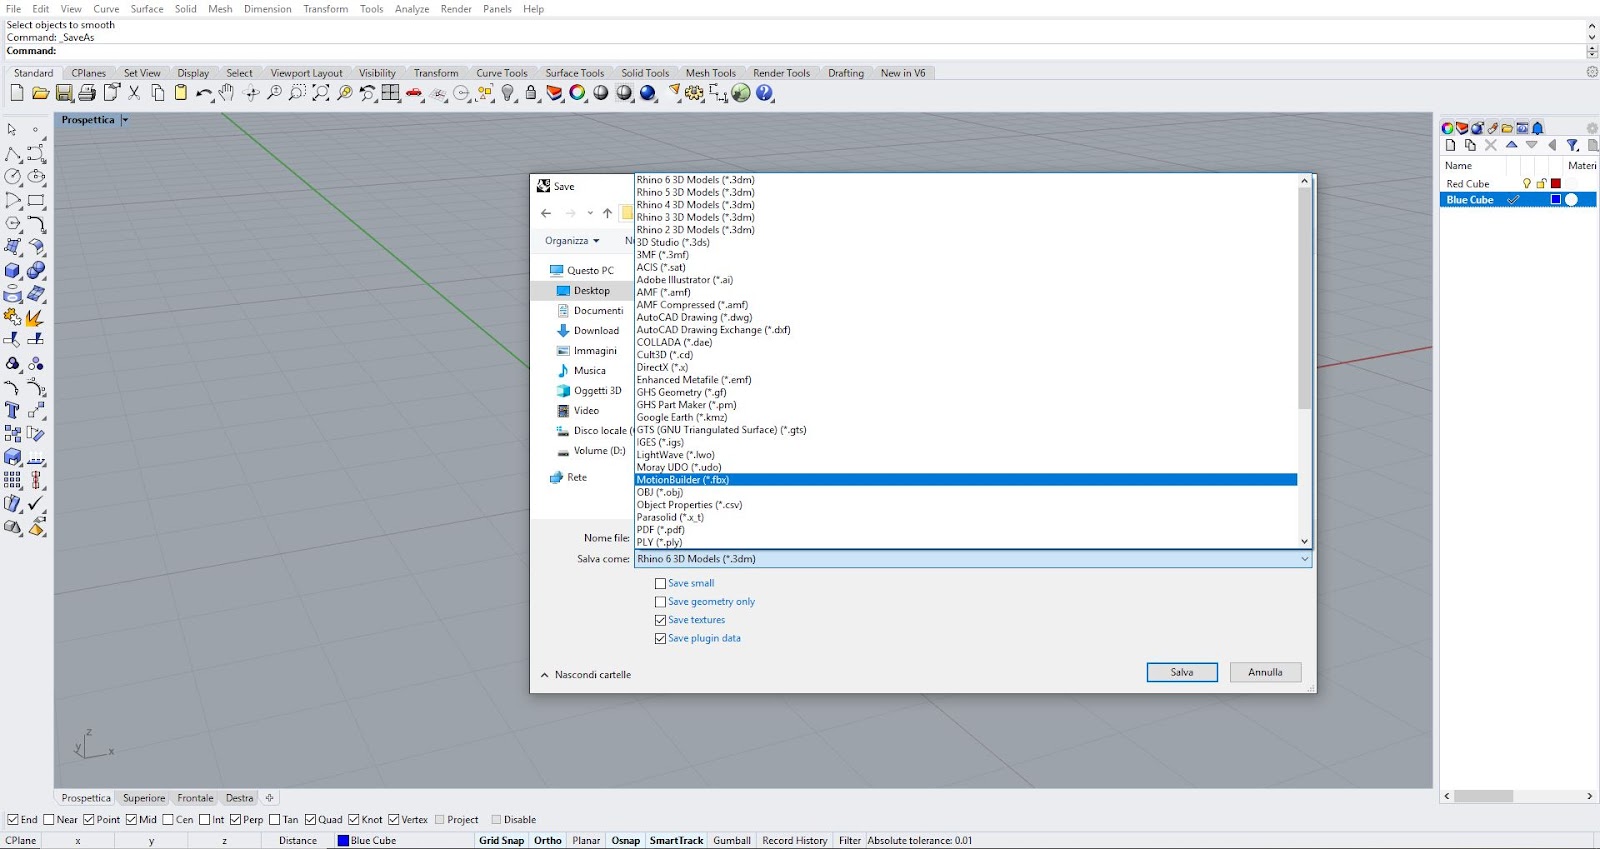
    The “Video Maker” TAB allows you to determine all the settings useful for creating and exporting cinematic animations in the form of video clips. Differently from the static rendering, characterized by a single image, whose realization is instantaneous according to the set resolution, the video contents provide a series of additional options, starting with a more articulated management of the Eyecad VR cameras.

    The TAB “Video Maker” interface contains the command to insert a new camera, a central part dedicated to the timeline and the settings of the cameras in the scene, like the target camera, time setting and delete button, while on the right it is possible to select the resolution of the animation, add an audio track and export the clip once all the necessary settings have been defined.


    ozdzIAJ3b2Ry9XQX5a6YbhPhZYxja9eyYNE4-JRR2-Oa2s9uTI3muyYsRa9AeloNJg8r9ecFce4qpeKe5yuU57J-q6xM9xJHogzJLeDh4FD_u2A4hGmLayl4LJh9_sZxpMTzcvRV


    The “Add new shooting” command allows you to insert in the scene a camera with which is possible to set all the control properties of the video animation shooting.


    I1jU9RdGDETvO03z25Cyp2k_a-TeN2Kmlp5QQbBRH0sCrTj-Vr_V_pbSsyyuf35JEjbQDK2lHJc2w7nDH0oKl9nuMdD7nMSKbtiB9dg_sYho6KDUffvusizX3L4v6lhTq2dX-EVi


    The insertion of a “New Camera” in the scene automatically creates a sequence in the central area of the “Video Maker” TAB, whose default name will be “Camera shooting 1”, with a progressive numbering that follows the video cameras created in the scene.


    FEQcb8NVKkQpIisG14E1bu6nvuH1CuxOYTyeYXJlAgoqeDKhf7DhurM9HniaKBO4X80tikoiFahfyafafi4gYVSNk3cq2Xw3S1KR3VeX8Ow0AkOytA1I1wLprFGGJojUB2_cEyRG


    The sequence icon indicates a series of fundamental informations, with the possibility of activating the relative modification options. In detail the four options allow you to perform the following operations:

    • Delete – It completely eliminates the selected recording.
    • Target – It allows you to set an observation direction for the selected camera path.
    • Time settings – It sets a start-time and end-time. This option is usually used for performing timelapse and shading studies, which require proper solar positioning. Regardless of the times set, the recovery will always have a duration coinciding with that set by the sequence. The result is a more or less accelerated lighting variation in the generated video clip.

    By selecting a sequence, the camera that determines it is selected in the scene and the point of view will be inside the camera shooting within the preview window.


    UAM3_3bpN8BquEQBf4W36gVq7N2QeqN31myMJk45LnEwD1oF_mh_sUDvDTbJ9NH3Gj3wgJqklgYCtST2nngbNYivu_XH4NnWQpwSVjOvPan5Nzh9s6SuwcTFfo0XMJyoVOPbzNc1


    Is possible to create a maximum of 6 clips for each camera shooting. The clips will determine the number of the Key-frame saved for the entire shooting. Inside every clip is possible to set the camera parameters:

    1. FOV (Fields Of View)
    2. Focusing aperture
    3. Filter intensity
    4. Reset X rotation axis
    5. Delete (in refer to the selected clip)

    When you move the clips or you change the camera parameters of the clip, is very important to update the clip values by clicking on the update clip icon.


    p6YHHmBZhCGXUAqgR_3EqjOTav0qA4L_v9K9L9VW6CKt4WwkwU3GsYras-ottlxIUJkg2J4_asZhCQqMFKs6KM1lQVQyA7kbi6AIyCt56iRaBLtf5LMNxvm4kBmtfP5CGPL1SR_E


    Inside the Preview windows, for each clip, is possible to add photo-filters.

    You can activate a preview of the shot at any time, simply by pressing the “space bar” or clicking on the “play” button, after selecting a shot.

    The right side of the TAB “Video Maker” provides a further series of commands, functional to the completion of the shooting and the export of the video clip.


    zMJT6zdqWd7_ciea2dBS2K-P8WO2H55pSVwfXnLw65DRlz_MmzJ-Nt2E6ruT8Z58AXbeNBPumnVu-6vLrP8Me7x7Wgpm7MJhtizCmG4BT50fD2ofsVuSDtsLcJIbzeeAlnVO--dt


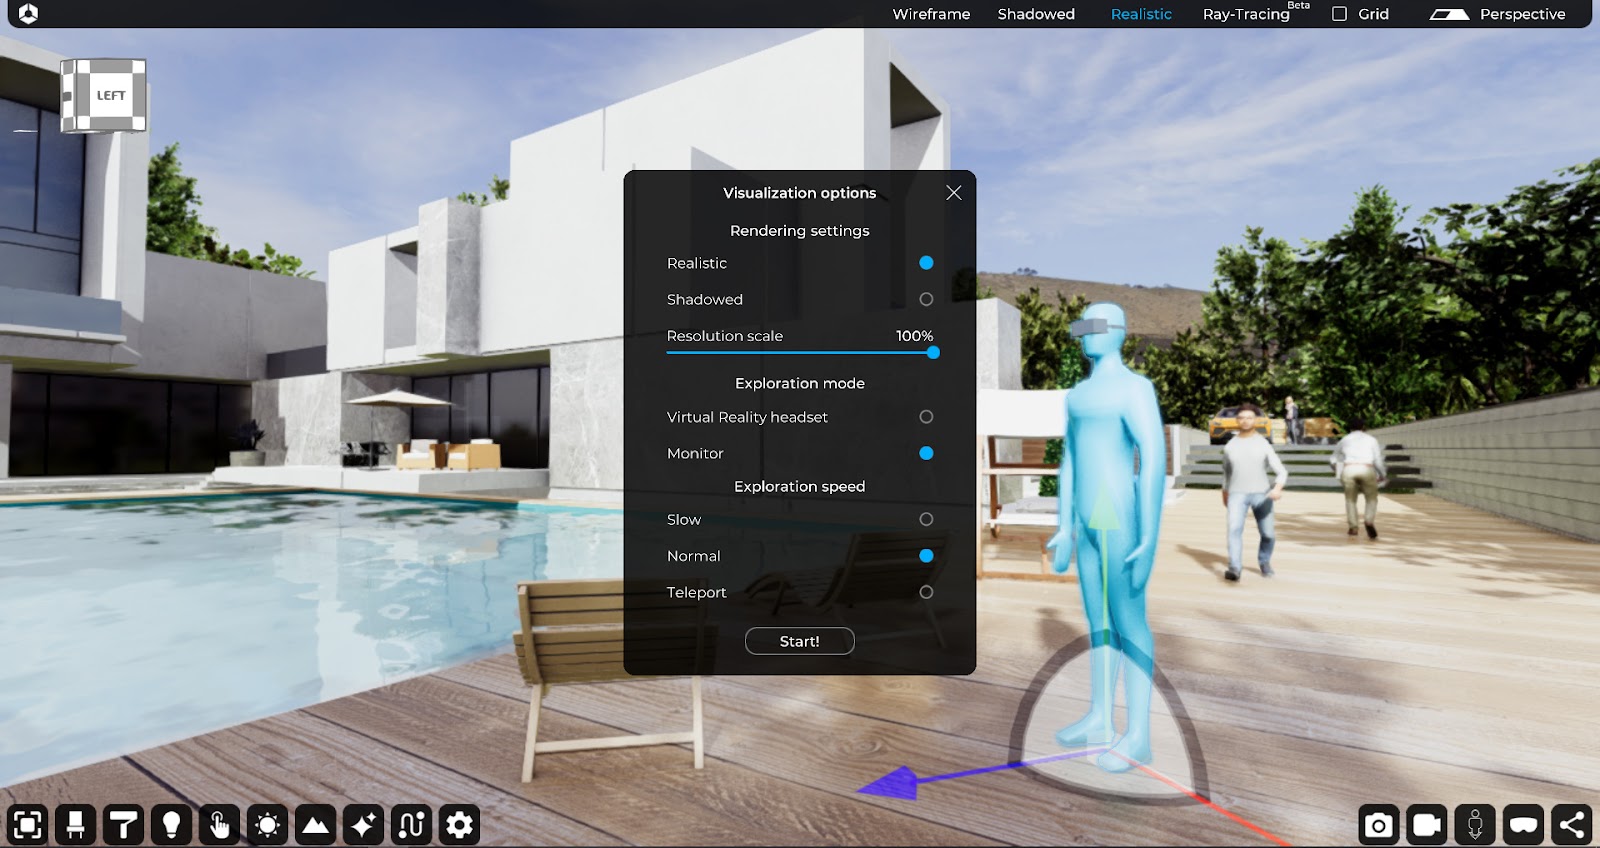
    The drop-down menu at the top allows you to set the following three video resolutions:

    • HD 1280×720
    • Full HD 1920×1080 (default)
    • WQHD 2560×1440 (2K)

    In the lower portion there is a player that allows you to quickly reproduce the sequences present in the “Video Maker”, while the central part is characterized by the presence of two icons:

    AddMusic – It allows you to insert an audio track in the sequence.


    bxB9JOJQQMNGfc6faVZoe7yZSHwZKb7xF5ux_tGu0xmLx_LTU5XPKUBXqW2uMvGIk8p41YPVSBsAzCPoisl21tRtjhudECAIt3K7MGmNubLnR2QSe4dquvTIsW4AqyRAA4H38SLS


    Export Clip – It lets you choose the directory and name the video clip to export.


    gDvjkuCvRnV40SjlLsQSZj8BJDvOONNXeqC3Tjb04v2TToOHGZrWdeIziR-5NFfHhwltDEWhVaVSsW_SMnTxEWVqMZjak1-CbPdfi9r8uFL85h4Bq454XUtO5f3Tcnxnr6xxOcjA

    The projects realized with Eyecad VR can be explored both via monitor and via Virtual Reality headsets, and there’s the possibility to interact with the project.

    The real-time exploration is a powerful tool available for the Eyecad VR users that have the possibility to take a look at the project.

    Starting point of the 3D Exploration

    First step is to set the starting position through the Eddie’s position (Eddie is the blue man that appears in the 3D scene).

    In fact, by clicking on the 13th TAB of the User Interface (on the right of the screen) is possible to set the Eddie’s position.


    1utBt6BentwF8J2jhVpSs9SG0dBvj2djoCFF7h8oagfxc_zybF3qJsbg6ddcr_wSjSMHe8qFLb6NugBeX7GMIUhzsk4izBj991QhU-2VSOFgLNY72ZtElDzmWXH4S0h8DbTyzLbH


    Once setted, is possible to click on the 14th TAB of the User Interface (the glasses icon) to go to the Exploration settings:


    n-k2YYiX1XEYNGuaAAGlVLqvkpAJtY1zrQPp6vzZi5al_sg246kAJUf-z1LlRCFbe0vAtX2sXHaCdeaNn1nMtelSTOV_jq6ccUg5IP43Vdwoo5zlQOeD71VOQUUgeL9jFkxwk1S-


    Visualization Options

    The visualization options tab allow you to choose the most important visualization settings:


    Rendering Settings:


    • 1. Realistic
    • 2. Shadowed
    • 3. Resolution scale


    Realistic mode: The real-time rendering is turned on and it is possible to explore the project with the all lights effects created from the realistic rendering mode by Eyecad VR. This mode has been designed for high-end PCs.


    Shadowed mode: The real-time rendering is turned off and it is not possible to explore the project with the all lights effects by the rendering engine. This mode has been designed for not-high-end PCs.


    Resolution scale: The resolution scale is usually set at 75% and it is helpful to do not overload the GPU of your PC. However, is possible to slide down or slide up the value in based to your needs.


    Please note: the resolution scale should also be set in based on the polygonal complexity of the 3D models.


    Exploration Mode:


    • 1. Virtual Reality headset
    • 2. Monitor


    1. Virtual Reality headset: By choosing this option, is necessary to have one of these VR headsets in this list:

    • Oculus Rift CV1 (Windows only)
    • Oculus Rif S (Windows only)
    • HTC Vive
    • HTC Vive Pro
    • Windows Mixed Reality headsets like as Lenovo, Acer, Asus, Hp, Dell etc… (Windows only).


    Before starts the exploration, please, follow the configuration for your VR headset. Here you can find a little guide that could be helpful:


    Steam VR

    Every VR headset needs to communicate with the Steam VR software. So this step is the most important independently from which headset you have.

    1. Download and install Steam software from this link: https://store.steampowered.com/about/
    2. Once installed, download Steam VR from the Steam shop (it’s free!) from this link: https://store.steampowered.com/app/250820/SteamVR/
    3. Configure Steam VR by following the Steam instructions.


    Oculus Rift CV1/S Setup

    1. Download and Install the Oculus Setup from this link: https://www.oculus.com/setup/
    2. Configure the Oculus by following the Oculus instructions of the Oculus Launcher.


    HTC Vive/Vive Pro Setup

    1. Download and install Steam software from this link: https://store.steampowered.com/about/
    2. Once installed, download Steam VR from the Steam shop (it’s free!) from this link: https://store.steampowered.com/app/250820/SteamVR/
    3. Configure Steam VR by following the Steam instructions.


    Windows Mixed Reality Setup

    1. Download and Install the Windows Mixed Reality Portal from this link: Windows mixed reality | Download
    2. Configure the WMR Portal by following the WMR instructions.
    3. Install Windows Mixed Reality for Steam VR from this link: https://store.steampowered.com…ixed_Reality_for_SteamVR/


    2. Monitor: By choosing this option, you are able to explore your 3D projects via monitor by using keyboard and mouse.


    Exploration Speed:


    • 1. Slow
    • 2. Normal
    • 3. Teleport (only available for VR headsets)


    Start

    Click on the START button to explore!

    One of the most important Eyecad VR feature is the possibility to share your own project with your work friend or customers.

    You have different ways to share, from Desktop (EVR files) to another Desktop, or Panorama tour through the new tool EYECAD 360.


    In this guide it is explained how these two different sharing modes work.


    Z2tsOfqy-lA7nXeUFUXDrRVOOVcE249TaiMaz2sf2ellLw4VLXq0JS0yhuGyj1ifEmX5MfC7qpWy8jg6-DHfBu5OxSUT4j4PRKN9TtAU0uPqzdDh4KNcisEjFx1iE21E-CBZ42JA


    Share Interactive explorable scenes in real time (Desktop only).


    The first thing to do, is to click on the “Sharing” TAB that will drive you on the sharing mode you need. Click on the “Desktop” icon and go forward.

    At this point, you can just click on “upload new project” and you will obtain a link that you can use on the Viewer. Your customer or work friend will download the explorable scene only (not editor mode). You can manage your projects in cloud inside the VR Viewer Manager.


    aVVhEU8wNXd5ATfsY6ZtSMWNJJ1cdKoF_iZQB0G0Ad1wLGP-kmWKCuwIpv5AOm2Mc7KLXJSGapkAVWbeRdOe3k8ulivZJpN-Kd_YK4lPfxPrbXhQDcYk1RzTRqM12K7zaLTCiuE4


    Remember you need to save your EVR project before to upload it in cloud.

    Inside the viewer, the project will be explorable via monitor (with keyboard and mouse) or via PC VR headsets :

    • Oculus Rift S
    • Oculus Rift CV1
    • HTC Vive
    • HTC Vive Pro
    • WMR headsets


    Create and share 360 degree panoramic tour rendering via web-link (Desktop and mobile)


    The new EYECAD 360 tool is very useful to create and share 360 rendering tour to your customers or work friends.

    The first step is to choose the “360 degree” icon to enter in EYECAD 360 in the “Sharing” TAB.

    Once inside, you need to create the first photosphere by clicking on “Add”.


    _ZNUJhh2q0ck4N3jbcUwxW2HX6zTtqGXNT5TRXZLTz3THVvQp23svctJboL9BBHyfWDmP0ShCjU8reqFzh8Mrk90XN6OjvvHwUk6Ku-YrmM7gmz9LUhwZKq_nhq3vXbPvCrEDFMU


    Now, you are in the preview mode, and here you can update the position of your point of view, change the brightness, the hour or the POV height from the floor by the lateral editor on your right. When you click on “Update position” the camera will be locked to help you to understand that the Point Of View has been saved.


    2JPQpeX9RnBPYZTmBWiO8rKy8CT4uI7MeJfTvPruZADYo2SpPeSb5xAr35JsBm69A6F_hywSRmO_6JvN11AQjIxHPWZStZiFu3NvNxhIkxyPFri3JiF8HySazYXzmHN0X26TY1Cr


    At this point, you have to click on the “Render Panorama” icon (remember that you can render in both realistic and ray tracing mode).

    Repeat the same workflow to add a new Point of View.


    3e5JpvoX8R47A-8BMrA43O7xFRUdecGRX8TRlUYuNvg6oq6ICw4QnfZLwVyVnIKNmeVmCBLRacq4T3t7yAVgLvhDGPQt7kH9H228hrRxZrF7pR1-KouSVSmxygMgwsLlq__EIEwL


    The last thing to do, to create a tour of the all 360 panorama scenes created, you can add, in each scene, the Teleport points, by clicking on the arrow icon. A new menu will appear in the preview window and with a simple drag’n’drop action, you can add the teleport point of the other 360 rendering created.

    When you have finished to set the tour, just click on “Upload in cloud” to create a weblink to share to your work friends or customers.


    msilR_JMRn_I5hpsy5PtHSoyWVFtWJkfxiQBj3oXoukk60voiJZ1AJrmcylOqsgD9idaEo3gc-YURUHMGxRYfG3Tx6nIKBPE8zWSfMYSojbtHyB0WdOl0dSuSegb2d7pj8QqMist


    The 360 Panorama tour could be manage inside your own personal area in eyecadvr.com.


    yzOL4UAUlyCBmExMyfjdsr7ydPL_0d0yH_-klz_7prvml1Kkb3yCHjWdYEYoDV1VGG7N79dhEWGf2JfixIA_qHKvIZRGELKWHIJwYGjK8BYdrxoyn1iHIdNh84wepqgLblM1bE5_


    Inside the “My eyecad 360” area, you can open the link or, by clicking on “Embed in your website” you can add your panorama tour on the web.


    This sharing mode is compatible with every device that could open a browser, from smartphone to Desktop, and is possible to watch the panorama tour with PC VR headsets or mobile VR headsets. In the case of mobile VR headsets, you need to open the browser and enter in your personal area of the Eyecad VR website.


    Mobile and standalone VR headsets:

    • Oculus Quest
    • Oculus Go
    • Htc Vive Focus

    The “lite Ray-tracing” is an interactive ray-tracing mode that is possible to choose to activate on the upside of the screen in Eyecad VR.

    tn6pwlx5SgeQV_PCZIoqFBW01xgtE5QfbGXEPTvAejwE9ayPoKIlWe69QeLYOZw23BkjbMVHPJ5cWQMSSiCsIyx9pqZIH9tn3GXcX9TNX_iryV0hDO7aNWjt5jq4nr8AqnFW9HQ8


    Ray-tracing in Eyecad VR is very fast and is possible to use it in real-time inside the Editor to allow you to verify in real-time how the lighting changes in the scene.

    What is Ray-tracing

    Ray-tracing is not a new technology, but now, thanks to the new 2019/2020 hardware is possible to use it in a very fast way as never before. It is a physically light process that allow to elaborate highly realistic images. Eyecad VR has created its own version of this technology and wants to give the possibility to all user to use it without go to hard Computer Graphic software. Obviously it is necessary to have a minimum of knowledge in the CG field, but if you follow this little guide it will be very easy to create realistic renderings at the speed of light.


    MXkNtr85kLX0JtfIxwQBX6e3WrozT_h0dvutSqPXq2b5eoQsQ1wt9ikZmewWyjWw7VIsE7p9-bg7uP-9zyiUWwbnBR5z3h9tcx8fUe2vywnGYAPW7ComioFo37-P-tKJyoqCto95


    Ray-tracing Rendering / Still images

    Thanks to this technology is possible to create awesome still images in less than a minute. In Eyecad VR, is sufficient to turn on the Ray-tracing mode inside the Camera view.


    fwBy1vX_GC8diObJoPdNuUVpYRMzGVB8apcXKT_jPiKysxo3X2SJDNQvUofQyMpPrBZDlUuTAXwBgyCSSeq3UNslOI_z1PflOaOXGqLtKdn5Sk2q4MZ1OEL5gkii9lW65wgHLJga


    Ray-tracing Video-animation

    In Eyecad VR is possible to create video-animation with the Ray-tracing mode, however, this mode is still in preview version, so it could cause some noise in the exported video file.

    Ray-tracing for Virtual Reality

    Ray-tracing in Eyecad VR can not be used for VR exploration. This kind of technology requires a lot of the GPU power and at this moment is possible to go to virtual reality through the Realistic mode only.

    Ray-tracing Hardware Requirements

    To be able to have the best performance from this technology is necessary to have the latest GPUs, especially the NVIDIA RTX series (2060, 2070, 2080) or at least the NVIDIA GTX 10th series (1070, 1080). The latest AMD GPUs work in Ray-tracing, but not at the best possibilities, because no AMD GPU has been yet created for the ray-tracing compatibility.

    The first step to follow for a correct import from Cinema 4D is to observe the export formats compatible with Eyecad VR. Eyecad VR can import in various formats, but it is preferable to use (in order of importance) the FBX and the 3DS.

    Cinema 4D versions with updated export formats range from R15 to R21.

    Once you are sure that the Cinema 4D version is compatible with Eyecad VR, you need to follow three simple steps to export a well-optimized 3D model for real-time rendering and virtual reality:


    1. Check that all the normals of the model are oriented in the correct direction. On Cinema 4D the positive normals are indicated with the yellow color;


    IqtsoitQSxfZTy4UdAsUO3fuOtwXyYehhmeCv9ZL-R8Tl9PJF_DuukL2_lTuFNZ_POqdrzP8MGgs78epC0QHQaD5z5rohUO9vIKmr5AlD6N3kzs77_4bwC1zvvecma29-QcOsYLy


    If, on the other hand, the normals appear blue, just right-click on the polygon concerned and reverse the direction of the mesh by clicking on "invert normal".

    Please Note: To verify the "visibility" of the meshes in real-time engines through the direction of the mesh normal it is possible to use the "Backface culling" function in Cinema 4D. In this way only the correctly oriented faces will be visible.


    2. Make sure that all objects on the scene are divided by layer in order of materials. In this way you will have more ease in intervening on the objects once imported in Eyecad VR.


    2peRft4HoMITs710pojj7uZi5IDnbee_Dvsh_uORr8kQVQoVWNaqOX387yTEBBUPYNbpiht-7krKPwHXUV33hYtOHBKPfse4SKUnGtpeJxhFu48-l7F6JWxdNgvpNArbPGlcWwLy


    Mapping objects to Cinema 4D will allow Eyecad VR to read texture coordinates correctly. If next to the layer you will find the icon that represents a chessboard, the objects are mapped and Eyecad VR will read those coordinates to adapt the textures.


    0Dg_5YfTsLF83zpggmMuuUqtz19vmnHP1P5dRsjY8-1LCGzPrB_mIaTI8O16ShzCQSMaEBqc4-pU1GANfl-ngYfiEai1fOzhOZjroVIalfcy05vpQ-1lrk7edwz6SNqSTrnpeUog


    3. Once you have followed these checks, simply click on "export" and click on the desired format. This guide shows the recommended options for a successful export for FBX and 3DS formats.


    idWqYsMEvEPtJ9WtvLAoGe4qWG1eccvv2xXKUAUqLcMKgH_R524Iq84dj-itcclyUplaUn8gK9O6xKkZ56hSsXS8Zh4DO-emkbEjsPD1_EsL6kgmAFkj9YHnW-j6rmCOoJRJu55G

    hxc5_KKhlb91IZA_Mroz8gXr7C2jlZi1um_J8JORlV7S3aCpcAyQl9m73w8wcSVu0KdDWgEmGRZbpg1epk8H7rkBfPArVDLDpUEMgm_Z-EKv3aB09f_90tUN2EUd3sTN0zFuWyBi

    The first step to follow for a correct import from SketchUp is not to export files created with SketchUp to external formats. Just save your 3D model in .SKP format and import the latter in Eyecad VR.

    The versions of Sketchup compatible with Eyecad VR are: SketchUp 2016SketchUp 2017SketchUp 2018SketchUp 2019SketchUp 2020

    Once you are sure that the SketchUp version is compatible with Eyecad VR, you need to follow three steps to export a well-optimized 3D model for real-time rendering and virtual reality:


    1. Check that all the normals of the model are oriented in the correct direction. On SketchUp the positive normals are indicated with the light blue color (dotted texture);


    bBALf-sl-u-9mtwuSoPOteMKvSpBFAGN_QKHNpeNJ-mGmGfQOWvrxULQi0wz7h_sf2Ys8Gcz8orNSwvQmgV6UfHK-Dq1l6RB3yPWwZVgjQsRo7PDbNvXu-QfoybtwZp4XVyR78mC


    If instead, the normals will appear dark blue (dotted texture), just right-click on the surface concerned and reverse the direction of the mesh by clicking on "Reverse faces".


    V2MWTxC8XENdfjNmPmmhS8vsGPHkhvUn7LC_Xilbglrns2KZd3ZXCyHbi8v5kyhQzoQWNnTRIbx6gHQvLMPDgtHoPcmgBjbbHmKgFzN-ex17bvgFiQvUD32HkibwPiiOEI5vJrce


    2. Make sure that all objects on the scene are divided by layer in order of materials. In this way you will have more ease in intervening on the object once it has been imported into Eyecad VR.


    EcD1LIiwg-wC8LAwA3PrR88VvSaJRFOhUUgFkg9ELXvjtDPRl2BHHpu9nMYfvc33cM82RSMpt6wbe9UgGo-GaxzNMkBro20PQ18q4LZbzSeM9w7_u-GylD26rWVzVJoR6VIwED60


    Texturing objects on Sketchup will allow eyecad VR to read texture coordinates correctly.


    3. Very Important: Make sure you don't have more than 450 materials in the SketchUp project for a proper import of the 3D Eyecad VR model.


    4. Very Important: Make sure you have created the 3D project as close as possible to the origin of the axes (coordinates 0,0,0);


    0vm5kPraM17Y9KVdT0ziyXzm6L9GSIno_s2N3V1h8WLLoXcA3D8jl1ZWNGAr6Gr1PcY3ckkEHlNZa55qH4zrWAxT7h-Iyb7SwEeey57EjQSzPz5qdSdZjyWfWMVu9RYVkRwYB1Wn


    Once you have followed these checks, just click on "Save".


    BDyihB6fW_l1MgoIcyCa3Sllf4OBLQCRed45RK9djPoy1osoEQHfIyK6notqYghHAX4dQskZO_lcxIxg2SX6odibhnAzPFsUCPCnbCvw_kw1GpSO4a_O8_ZQBYvKWGF8ZnOJjZ1J


    At this point you can choose two ways:

    Manual import.


    Import via Plugin:

    For a correct import via plugin it is sufficient (once the previous steps have been followed) to click on the "Go to eyecad VR" button which will appear once the eyecad VR plugin is installed on SketchUp. Before this operation there must be in an open project into Eyecad VR software.


    02bpMQrJq5ujFO3fX5deg16WerVACBRZeQCV6ds2GN1BZUhfm_zUszztu83ynmgFAQ3XcqdKVlo3fAxEKNrrf43_smBsxYlphkcH5bk9xsp8G18JFFmNtaYZsia4gXm2AKIPA1dF


    At this point it will be enough to click on "import" and it will be possible to find the 3D model in the VR eyecad grid.


    P1OmNr75Sob8WC-bIlTlb5XviFwTEUNaFVGIscdFegrt7i9Kul3T1IbTOWKuz80ZsvO4OXBpPBzpP0-fmKjLP9Jy-_Y9yODPg9dc-yXI89RFOB_Rh_6QDNn38laU3YMun7gW1yHo


    Manual import:

    For a correct manual import it is sufficient to follow the previous steps and go directly to click on the "import 3D model" button of Eyecad VR.

    Now you need to select the .skp file that was previously saved and click on the "open" button in the dialog box. Once the file has been selected, it will be possible to click on "import".


    aSUFe2llV2e1vROhcAXYIRzd3X2O4jr3fIluVa3KJ0vYsFpVaBmBu7FYVV8PtbWvShR6NpJy1A-KwN_QFvcqUtGmqKeTJBAkjRKYqmee1lySJv9wslF744n-7hlxNfLLrTGdqx6F


    Then drag the 3D model from the personal library on the Eyecad VR grid.

    The first step to follow for a correct import from Rhinoceros is to observe the export formats compatible with Eyecad VR. Eyecad VR can import in various formats, but it is preferable to use FBX and 3DS (in order of importance).

    Rhinoceros versions with updated export formats are Rhinoceros 5 and Rhinoceros 6; the latter is preferred over the first.

    Once you are sure that the version of Rhinoceros is compatible with Eyecad VR, you need to follow two simple steps to export a well-optimized 3D model for real-time rendering and virtual reality.


    1. Check that all model mesh directions are oriented in the correct direction. On Rhinoceros the surface normals are indicated by calling the "Dir" function from the command line. In fact it is possible to notice that all the meshes are oriented towards the outside of the object; this is the correct way to export 3D models from Rhinoceros to Eyecad VR.


    B3WBgRikOlLuujR6EGPHectR7egoVvQPdZ9Nn_LGvdF-0QxxiKbj95GlklW6eTQuipRmst1GuDThlw8cT3nZU6KOzn1aR3czBMWbft9ZaN6Y0NF1Owaq2ev7CGboeMJKdLP0jPoU


    If, on the other hand, the normals appear to face towards the inside of the object, simply select the surface with the wrong direction and click on the "dir" command as shown:


    XDfZ62jrqxhMEC2IviU7A1DkVhzYKzm3iPrrYUWm3RdCX6V_vIrk1r5iMGyMn383wK9FX3LXxRZU9pMVYM6htKYAXnfQjaEDcbBo74UDyo-w7vcy4hR3xgZTo7zOXJBCEBt4zqii


    Once this is done, right-click on the "invert" command to change the direction of the face as shown in the figure:


    qs6ku40OTqIJxONDGLOm_ATWLLx3K4mdpHzHHFIQF6tLfz8N5LEtAZ2Oe1hHrBvZb4ABJaeoMyj_VHdOfOBqe9-K4jSxdBfypbwxs5WWsxqWm4uGdnGuPEaLbW4w24wFwT3Yp63f


    2. Make sure that all objects on the scene are divided by layer in order of materials. In this way you will have more ease in intervening on the object once imported in Eyecad VR.


    Vc4A9npVjpXjN2NAvoWQtKVGuusshff5vfX7UROcib5GzHaV2VeKuHtgDFXs8hotFXpS9OZ-0_KHhMmgd2lM8E2q2BYUeZbjmj873fJUDXRYDykQFfBWoUWPSNGNlhpZ7rej3bRy


    3. Once you have followed these checks, just click on "Save as" or “export selected” and click on the desired format. In this guide we will show the recommended options for a successful export for FBX formats. Be sure to select the format: MotionBuilder (* .fbx).


    Tpp-f5uRIFCioXKh9AaYpFlrzioqZqAcibs77zakTs-N51SNOb-QshYQL89-3-XeuZbTjwIn6IoLO3Ma0e9RprmJN-1H4kKvgToqH2UAXYq6hINN5-CB13pOfATDpDPVEQIYw2Bq


    Select these settings in the dialog box:


    xAGQrq3IZYWMf_3XM_ppQnX40wFJxB1Q7Vf_80BvtaecD6gDmwdCE-30PbUhbgrZJrpgZpkMhsPdCToPToXwaNP3bmRefKSt7Y_YzVbmEFMJhMLoGfPYGTdbGVXBN9X3OI1Nv45k


    Make sure you do not overdo the number of polygons during the transformation from N.U.R.B.S. to the mesh. Descend with the bar as much as possible without compromising the quality of the 3D model.


    _py210MJo-WTEB3kV5EvTy0oNaarIlmz58OiNg-H2CJlG6oQxfQ-ISGPYff_6JiqaHXAtWWO2almaJ5RsSz0C3ncwVvF9_7A0H0zqGhJRdjB6i0-3_cDlsNPpuw3IRTq5SpX0KoQ


    Alternatively, you can choose to export the project using detailed mesh checks.


    DGm-xk5golsdM8Dvq0J7M_Bq0jfvoKbMg_mTjAzkJ-MpOWs6J8MuKhMXFK-x2J4tphtURWJXkji8YtDDyGSgD69mQC8YbOAQFBeP0xX72ytwjktDAkXwGOWb86OMYeG7FoAYkPVJ

    • PC: It is very important to have the video card drivers always updated to take full advantage of the potential of Eyecad VR.


    - Nvidia: If you have an Nvidia video card, you need to install Nvidia Geforce Experience to download and install the latest drivers available. You can download Nvidia Geforce Experience here: https://www.nvidia.com/en-gb/geforce/

    - AMD: If you have an AMD video card, you need to install AMD Catalyst to download and to install the latest drivers available. You can download AMD Catalyst here: https://www.amd.com/en/support/kb/faq/ccc-install


    • Mac: It is automatically updated by the MacOS integrated update system. Be sure to perform a check in the Mac App store if your Mac needs updating.
    • PC:
    1. Nvidia: Eyecad VR is compatible with Nvidia GTX series 900 and 1000; Nvidia RTX series 2000 and 3000. RTX is highly recommended for the future and for better performance especially for Real-time raytracing and Virtual Reality.
    2. AMD:Eyecad VR is compatible with AMD Radeon 560-70-80 PRO.
    • Mac:
    1. AMD: Eyecad VR is compatible with AMD Radeon 560-70-80 PRO.

    However, for Mac, you can use egpu-Blackmagic with Radeon RX Vega 56 (best performance) or Radeon Pro 580. (https://www.blackmagicdesign.com/products/blackmagicegpu/)

    When you buy or try an Eyecad VR license, you need to look at your mail folder (registered on https://www.eyecadvr.com) where your license key will be sent with the link to download the Eyecad VR Launcher. Once the .Rar package has been downloaded, inside you will find two different folders "Windows" and "Mac", extract the Windows folder. Once the Eyecad VR Launcher setup has been downloaded, extracted and installed, execute it by entering the email registered at the time of the license request and the personal license key received by email. Once inside the personal launcher, you can download the Eyecad VR software and run it by clicking on the icon of the same.

    When you try or buy an Eyecad VR license, you need to look at your mail folder (registered on https://www.eyecadvr.com) where your license key will be sent with the link to download the Eyecad VR Launcher. Once the .Rar package has been downloaded, inside it you will find two different folders "Windows" and "Mac", extracting the Mac folder. Once you have downloaded, extracted and installed the Eyecad VR Launcher setup, run it by inserting the registered email at the moment of the license request and the personal license key received by email. Once inside the personal launcher, you can download the Eyecad VR software and run it by clicking on the icon of the same.

    • PC: Eyecad VR was developed for Windows 10 - 64 bit, but it is also compatible with Windows 8.1 64-bit and Windows 7 64-bit, however it is not recommended to install Eyecad VR in these old operating systems, especially for virtual reality explorations.
    • Mac: Eyecad VR was developed for High Sierra but it is now also compatible with Mojave. However, the Mac development has been suspended. Check this news for more information about the topic: https://www.eyecadvr.com/blog/…-for-eyecad-vr-for-macos/

    If you can't see some faces of the 3D model in Eyecad VR, these are probably flipped. Control the direction of the mesh in SketchUp, Cinema 4D, Rhinoceros or in the most popular 3D modeling software, they all have the function that allows you to reverse the direction of the 3D model mesh normals. Usually, you can correct the direction of the normal of the mesh by right-clicking on it and selecting the inversion option (the latter can have different names in each 3D modeling software). In SketchUp and in most software of solid modeling, all faces of the 3D model are visible from both sides. In Eyecad VR the back of the mesh is removed from rendering due to performance issues.

    - Make sure you have dragged the imported object from your personal library to the grid in the 3D space of Eyecad VR.

    - Position your 3D model at 0,0,0 coordinate in the 3D modeling software before exporting it.

    - Check the scale of your project. Eyecad VR works in meters.

    - You can use the “Object locator” to find your 3D model in the grid. It will appear, once the 3D model has been imported, at the top of the 3D model and an arrow on the screen will help you to find it.

    To understand if you can export your 3D model to your personal cloud and open it using either the web-app or the Desktop Viewer (by entering into the “Exploration” mode when you run Eyecad VR launcher) you need to take a look at the size of your EVR project file. The EVR file cannot exceed the size of 250 MB to be uploaded to the cloud.

    In Eyecad VR you can explore your 3D models in two ways:


    1- PC Desktop/Laptop:

    • Monitor: Via classic monitor display using mouse and keyboard
    • VR: Via PC desktop viewers and interaction pads.


    2- Web-App:


    • Display: Through classic display on smartphone display via web-link generated in Eyecad VR Software.
    • VR: Through Cardboard compatible with smartphones via web-link generated in Eyecad VR Software. You can choose your cardboard here: https://vr.google.com/cardboard/get-cardboard/

    If you need support to understand how to export your 3D models to the web-app, take a look at our manual, in this section: Real-time Exploration